Firefox is popular in online privacy communities because it is a high quality, open source web browser that is extensively configurable. Unfortunately, those communities often instruct new Firefox users to configure Firefox in ways that end up hurting their overall web browsing experience, ultimately driving many new users back towards less private alternatives. After all, what is the point of being more private if other solutions just work?
After seeing tens of these experiences across the web (I help to moderate a popular Firefox community), I thought it made sense to share my own Firefox setup - one that doesn’t generally break websites in the search for privacy.
Note: This is an opinionated guide, and I know that my recommendations here aren’t going to satisfy many privacy enthusiasts. I’m sharing my setup to help people who want to be more private, but also don’t want to spend a lot of time tinkering with their browser - they just want to browse the web. If this doesn’t work for you, you know where to go.
This is also a pretty minimal guide - I want to reduce opportunities for issues, and the more changes you make to the base browser, the more annoying troubleshooting gets. People get frustrated and move on. That means that I am not covering Firefox add-ons or services that I use, but if you are interested, I can post about some in a follow-up.
Discuss this post on Reddit.
“Hardening Firefox”
If you browse privacy or browser forums, you will eventually come across recommendations to use Firefox because it is “more private, especially if you harden it”. This recommendation is pushed by authorities like Malwarebytes, but the most referenced source today seems to be the PrivacyTools guide.
Unfortunately, following these “hardening” recommendations often lead to significant degradradation of the usefulness of Firefox - slowing it down, disabling 3D functionality – even making logging into some websites impossible.
Probably the most problematic recommendation given is privacy.resistFingerprinting, part of the Tor Uplift project. It is anti-fingerprinting technology meant to ease the maintenance burden of the Tor Browser (based on Firefox) - not really meant for general users. Disabling this one option often fixes issues with web pages that seem impossible to diagnose.
If you are sufficiently scared off by the possibility of breakage, read on for my recommendations.
There are privacy features built into Firefox that are meant for general users, and they cause far fewer issues, and more importantly - are much easier to diagnose. Some of these features are not enabled by default (except in private browsing mode) due to the risk of breaking websites for the general userbase, and until recently, I myself may not have recommended the built-in features if you weren’t a privacy enthusiast.
However, Mozilla recently introduced “SmartBlock”, a collection of shims that trick web pages into thinking that their trackers aren’t blocked. From the introductory post by Thomas Wisniewski:
SmartBlock does this by providing local stand-ins … [that] behave just enough like the original ones to make sure that the website works properly. They allow broken sites relying on the original scripts to load with their functionality intact. The SmartBlock stand-ins are bundled with Firefox: no actual third-party content from the trackers are loaded at all, so there is no chance for them to track you this way.
This feature makes the the “strict” tracking protection option in Firefox much more attractive, and it comes with virtually no downsides compared to the “hardening” approaches detailed elsewhere. Read on to get started.
Basic Setup
If you haven’t already installed Firefox, start there. Download Firefox and install it. I linked to the beta release, since I believe that people using advanced features are more equipped to report issues that can impact the release population. Feel free to use the standard release instead if you prefer.
Once you have Firefox installed, you can do some setup.
Enable DNS-over-HTTPS
DNS-over-HTTPS (DoH) prevents third parties from snooping on what websites you are trying to access - people on public WiFi, your local network, or your ISP.
Depending on your locale, Firefox may default to DoH being enabled, but I recommend checking to make sure.
-
Go to about:preferences, or navigate to it by clicking the ≡ button, then selecting Settings.
-
Navigate to the General section.
-
Scroll down to Network Settings and click the Settings… button.
-
In the dialog box that opens, enable the checkbox for Enable DNS over HTTPS if it isn’t already enabled.
-
Click OK to save your changes and close the window.
You can optionally use a different DoH provider, but I haven’t experienced any issues with the built-in options.
Strict Tracking Protection
-
Go to about:preferences, or navigate to it by clicking the ≡ button, then selecting Settings.
-
Navigate to the Privacy & Security section.
-
Under Enhanced Tracking Protection, select the Strict option.
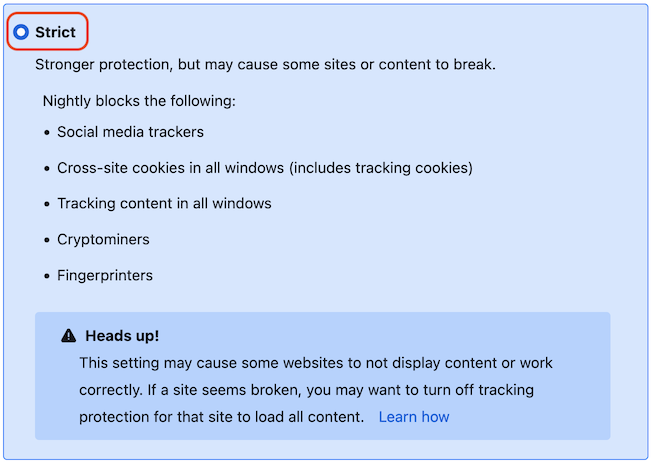

You can stop here and you will have a browser with increased privacy and minimal breakage. If you run into issues, tracking protection is easy to disable on a site by site basis (see Troubleshooting below). Most people can stop here, especially if they don’t want to do any troubleshooting. If you want to go further, continue reading.
Containers
If privacy fans aren’t thinking of privacy.resistFingerprinting when they are recommending Firefox, they are probably thinking of Containers. This is a unique feature in Firefox and not something matched by any other mainstream browser that I am aware of.
Containers might be an unfamiliar concept, so here’s an example to help explain it:
Imagine you’re working from home on your personal computer, and your co-workers are messaging you on Google Chat. You’re probably already logged into a personal Google account in your browser, and you don’t want to log out of your account – you want to keep listening to music on YouTube without getting weird recommendations. Maybe you open a new private/incognito window to do your work stuff, or if you are really advanced, you might even open a different browser.
Both of those ways of logging into your work Google account are kind of inconvenient though, since you can’t keep it open along your other tabs. If your computer reboots itself or your browser crashes, you might forget to reopen the incognito window or the separate browser - all while your co-workers are messaging you.
Firefox containers are a nice way to solve this problem. You can open your Google Chat in its own container tab that appears next to your other tabs. The work tab is color coded so you can easily tell the difference between your accounts. Opening links from the work tab will open those links in work tabs as well, so your work accounts are totally separate from your personal ones.

Separating work and personal is just one way you can use containers. You can create a container just for shopping sites, so the things in your shopping cart don’t follow you around the web. You can login to multiple social media accounts at the same time. You can even create containers for every site you visit, so that websites can’t talk to each other at all about you.
You can read more about containers, but the easiest way to get started is to install Firefox Multi-Account Containers.
I’m not going to talk about advanced container use in this post, but you probably want to know how to open a tab inside a container and how to create a new one.
Opening a New Container Tab
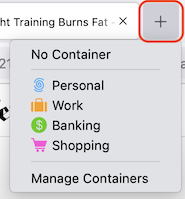
The simplest way to open a new container tab is to use the Open a new tab button in the toolbar.
-
Click and hold your mouse or touchpad over the + button in your toolbar.
-
A menu will appear with your containers listed.
-
Select the container you want to open.
-
Your new tab will open and any site you visit will be separated from your other containers.

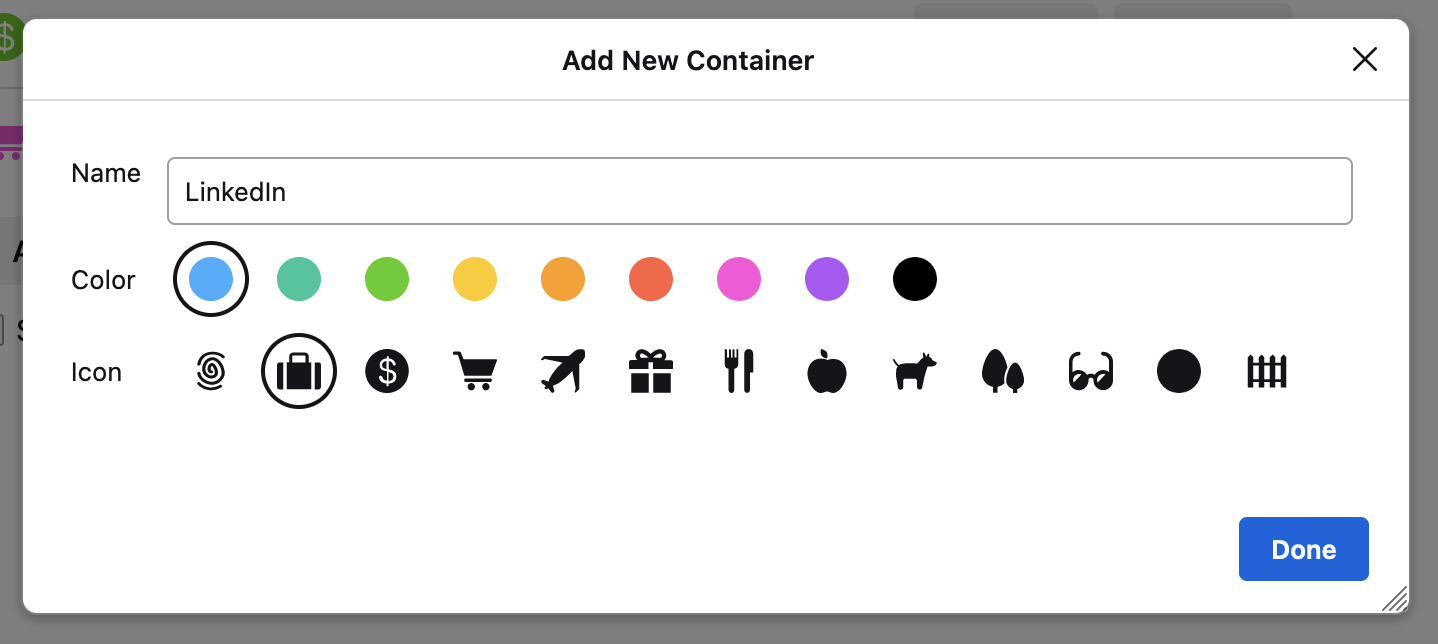
Creating a New Container
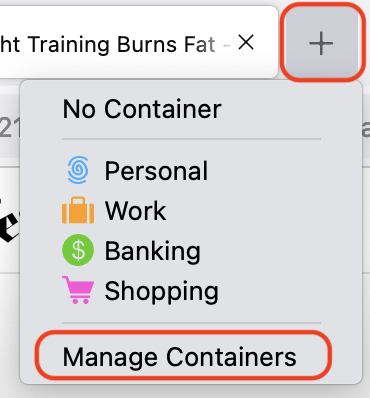
The simplest way to create a new container is to use the Open a new tab button in the toolbar.
-
Click and hold your mouse or touchpad over the + button in your toolbar.
-
A menu will appear with your containers listed.
-
Select the Manage Containers option.
-
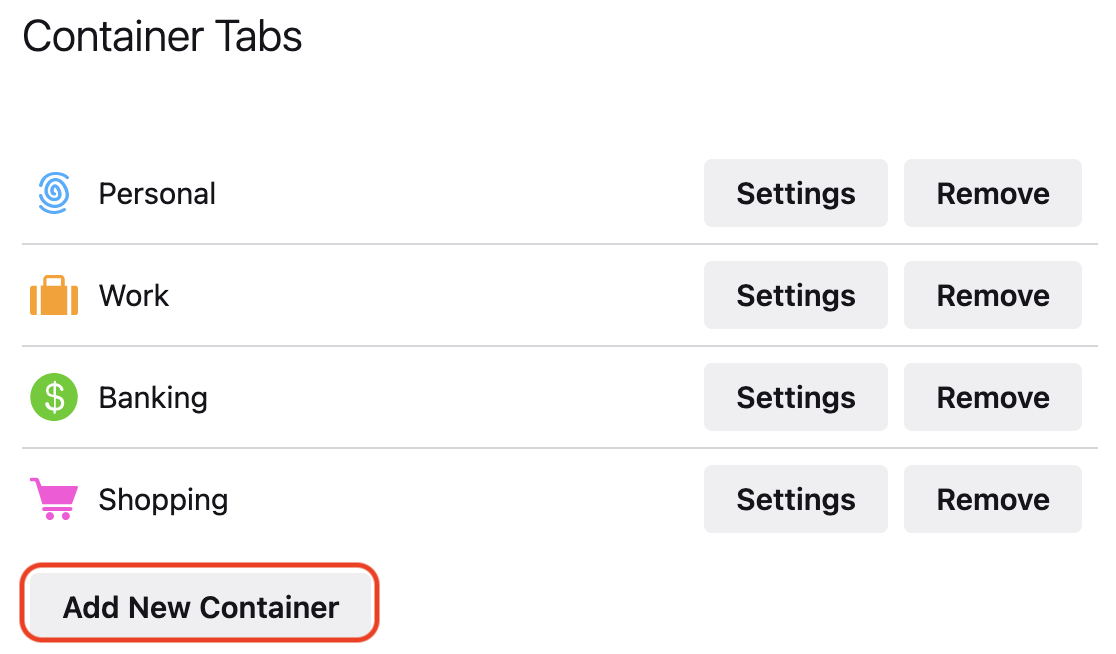
Click the Add New Container button on the page that appears.
-
Enter a name for your new container, select a color from the options, and the icon that will appear in the address bar of your container tabs.
-
Click the Done button.


Changing Your Search Engine
Firefox comes with Google as its default search engine in most of the world, and while Google is a good search engine, it is also one of the biggest players in the online ad industry. You may not want to share your searches with Google, especially if you use other Google services.
Fortunately, Firefox also comes with a more privacy aware search engine, DuckDuckGo, which you can default your searches to pretty easily:
-
Go to about:preferences, or navigate to it by clicking the ≡ button, then selecting Settings.
-
Navigate to the Search section.
-
Under Default Search Engine, select DuckDuckGo from the dropdown menu.


More Tweaks
If you are a more advanced user, and don’t mind some additional configuration once in a while, you can increase your privacy further. Feel free to pick and choose what you want to do, based on your preferences.
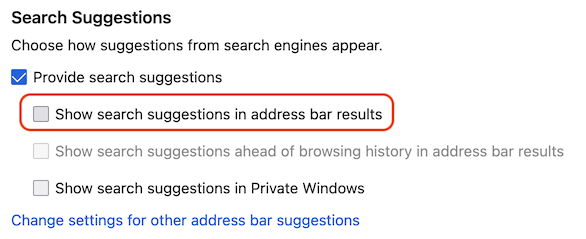
Disable Search Suggestions
Firefox by default shows search suggestions for the stuff you type into the address bar. These suggestions generally come from your search engine, which means that everything you type in the address bar is shared with your search engine, even web addresses. If you navigate to sites that you don’t want your search engine knowing about, you may want to disable that. Disabling these suggestions will still let you search from your address bar in the same way you do today, but only the thing you are searching for is sent to your search engine.
-
Go to about:preferences, or navigate to it by clicking the ≡ button, then selecting Settings.
-
Navigate to the Search section.
-
Under Search Suggestions, uncheck Show search suggestions in address bar results.

Add a Separate Search Bar to Your Toolbar
Before Google Chrome arrived on the scene, web browsers came with a separate search box that appeared alongside the address bar. Firefox still lets you enable it, which I prefer, since I can actually enable search suggestions while I am searching, but keep them out of the address bar when I am not.
-
Go to about:preferences, or navigate to it by clicking the ≡ button, then selecting Settings.
-
Navigate to the Search section.
-
Under Search Bar, select the radio button for Add search bar in toolbar.
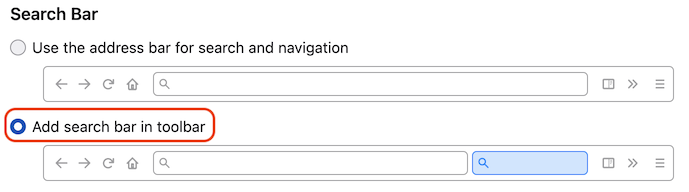

By default, the search bar will show search suggestions. This is how I prefer it, but if you don’t want search suggestions at all, uncheck Provide search suggestions in the Search Suggestions section.
Delete Cookies When Closing Firefox
I setup Firefox to delete cookies and site data when I close Firefox. My feeling is that most websites don’t really need to have a persistent idea of my browser over time, even if I browse them often.
Since websites use cookies to keep you logged in, whenever I close Firefox, I get logged out of just about every website. There’s a nice side effect to having websites forget about you - sites that only let you see a limited number of articles before throwing up a paywall think that I am a new person every time I restart Firefox. Of course, you should support quality reporting if you are able to.
There are other ways to achieve this amnesiac behavior, but I restart often enough (since I run Firefox Nightly, which updates twice a day) that I don’t need to run additional add-ons to do this. If you don’t restart often, you can install Forget Me Not instead.
Do not follow this recommendation if you don’t want to occasionally tell Firefox to not delete your data for a site.
-
Go to about:preferences, or navigate to it by clicking the ≡ button, then selecting Settings.
-
Navigate to the Privacy & Security section.
-
Under the Cookies and Site Data section, check the Delete cookies and site data when Firefox is closed option.
This setup can quickly get annoying, since there are probably sites you want to stay logged into after you restart Firefox, especially if you are using two-factor authentication.
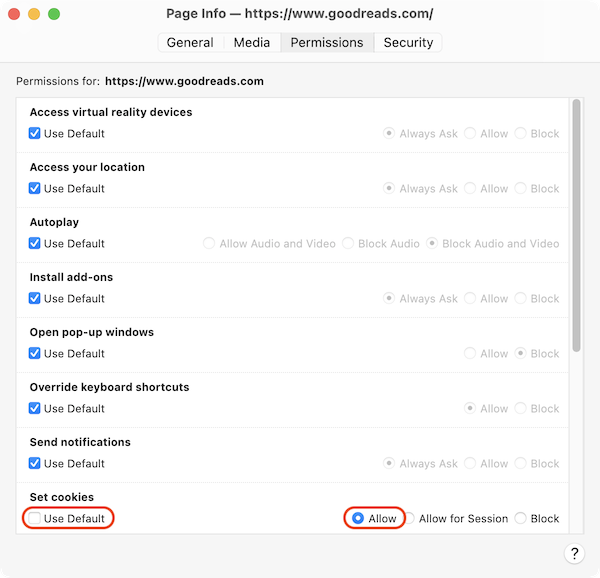
Setup Exceptions
Thankfully, you can exclude sites from having their data wiped when you close Firefox.
To add an exception, you can follow these steps:
-
Go to the site you want to save data for.
-
Press Control + i on your keyboard (⌘ + i on macOS).
-
The Page Info dialog will appear.
-
Click the Permissions section in the scope bar.
-
In the Set cookies section, uncheck Use Default and select Allow. On some sites, you may also need to set Allow on Store data in persistent storage.
-
You can close the Page Info dialog. Restarting Firefox will now preserve the data for this site.

Troubleshooting
This setup will rarely cause problems, but sometimes sites really want to be able to track you and will have problems if they aren’t able to.
In those situations, you can generally just disable Tracking Protection for the misbehaving site:
-
Click the shield icon next to your address bar.
-
Disable the toggle switch next to the Enhanced Tracking Protection is ON for this site.
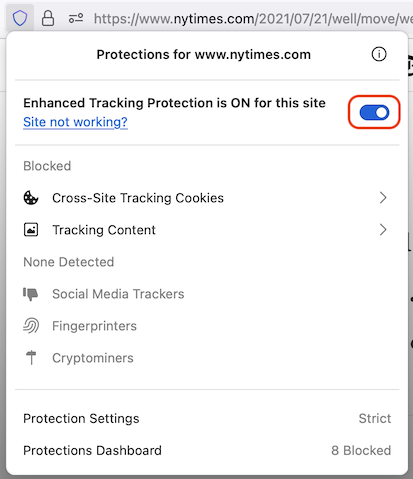
-
The page will reload and it should work without issues.

If disabling tracking protection worked to fix the site, you can report an issue to help others who may also be experiencing an issue.
If you liked this post, please consider supporting what I do.